Category
Difference between revisions of "Card Symbols"
From Shadow Era Wiki
m (changing |} format for phone screen) |
m (Changing code for phone screen - will need another edit) |
||
| Line 1: | Line 1: | ||
| + | __NOTOC__ | ||
<center><img src="https://www.shadowera.com/landing/img/blog-separator-2.png" ></center><br> | <center><img src="https://www.shadowera.com/landing/img/blog-separator-2.png" ></center><br> | ||
| Line 16: | Line 17: | ||
<center><img src="https://www.shadowera.com/landing/img/blog-separator-2.png" ></center><br> | <center><img src="https://www.shadowera.com/landing/img/blog-separator-2.png" ></center><br> | ||
| − | ===Ally | + | ===Ally's card=== |
{| class="wikitable" | {| class="wikitable" | ||
|- style="vertical-align:top;" | |- style="vertical-align:top;" | ||
| − | | | + | | |
| − | + | ||
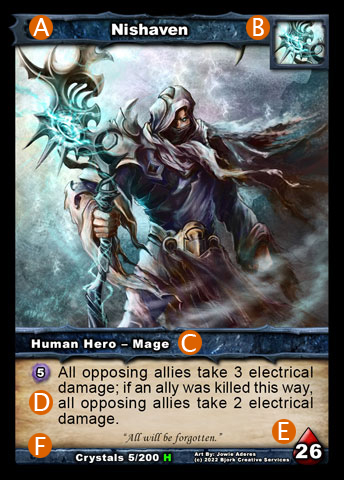
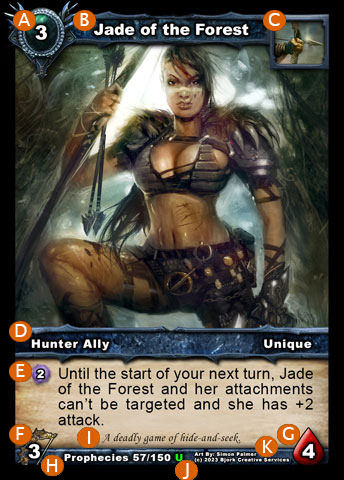
*'''A'''. '''[[:Category:Casting_Cost|Casting Cost]]''': This is the number of [[:Category:Resources|resources]] you must spend to play this card from your [[:Category:Hand|hand]]. | *'''A'''. '''[[:Category:Casting_Cost|Casting Cost]]''': This is the number of [[:Category:Resources|resources]] you must spend to play this card from your [[:Category:Hand|hand]]. | ||
*'''B'''. '''Name of the card''' | *'''B'''. '''Name of the card''' | ||
| Line 32: | Line 32: | ||
*'''J'''. '''[[:Category:Rarity|Rarity]]''': Indicates the rarity of the card (Common, <span style="color:green">Uncommon</span>, <span style="color:blue">Rare</span>, <span style="color:violet">Epic</span> & <span style="color:orange">Legendary</span>). | *'''J'''. '''[[:Category:Rarity|Rarity]]''': Indicates the rarity of the card (Common, <span style="color:green">Uncommon</span>, <span style="color:blue">Rare</span>, <span style="color:violet">Epic</span> & <span style="color:orange">Legendary</span>). | ||
*'''K'''. '''[[:Category:Artists|Artist Name]]''': Indicates the artist's name who drew the card's art. | *'''K'''. '''[[:Category:Artists|Artist Name]]''': Indicates the artist's name who drew the card's art. | ||
| + | |- | ||
| + | | style="width:250px;" | <center>[[Image:CardExampleSymbols.jpg|link=https://www.shadowera.com/wiki/index.php/Category:Allies]]</center> | ||
| + | |} | ||
| + | <center><img src="https://www.shadowera.com/landing/img/blog-separator-2.png" ></center><br> | ||
| + | |||
| + | ===Weapon's card=== | ||
| + | {| class="wikitable" | ||
|- style="vertical-align:top;" | |- style="vertical-align:top;" | ||
| − | + | | | |
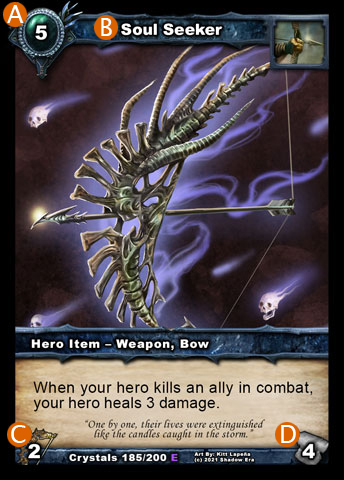
*'''F'''. '''Attack damage''': This is how much damage it will be inflicted on its target when in [[:Category:Attack|combat]] and the type of damage. | *'''F'''. '''Attack damage''': This is how much damage it will be inflicted on its target when in [[:Category:Attack|combat]] and the type of damage. | ||
*'''G'''. '''[[:Category:Durability|Durability]]''': This indicates the durability of the weapon. When it drops to 0, the weapon is destroyed and goes to the [[:Category:Graveyard|graveyard]]. | *'''G'''. '''[[:Category:Durability|Durability]]''': This indicates the durability of the weapon. When it drops to 0, the weapon is destroyed and goes to the [[:Category:Graveyard|graveyard]]. | ||
| + | |- | ||
| + | | <center>[[Image:CardExampleSymbols3.jpg|link=https://www.shadowera.com/wiki/index.php/Category:Weapons]]</center> | ||
| + | |} | ||
| + | <center><img src="https://www.shadowera.com/landing/img/blog-separator-2.png" ></center><br> | ||
| + | |||
| + | ===Armor's card=== | ||
| + | {| class="wikitable" | ||
|- style="vertical-align:top;" | |- style="vertical-align:top;" | ||
| − | | | + | | |
| − | + | ||
*'''F'''. '''[[:Category:Durability|Durability]]''': This indicates the durability of the armor. When it drops to 0, the armor is [[:Category:Destroyed|destroyed]] and goes to the [[:Category:Graveyard|graveyard]]. | *'''F'''. '''[[:Category:Durability|Durability]]''': This indicates the durability of the armor. When it drops to 0, the armor is [[:Category:Destroyed|destroyed]] and goes to the [[:Category:Graveyard|graveyard]]. | ||
*'''G'''. '''Defense''': The armor reduces combat damage to your hero by this amount. | *'''G'''. '''Defense''': The armor reduces combat damage to your hero by this amount. | ||
| + | |- | ||
| + | | <center>[[Image:CardExampleSymbols1.jpg|link=https://www.shadowera.com/wiki/index.php/Category:Armors]]</center> | ||
| + | |} | ||
| + | <center><img src="https://www.shadowera.com/landing/img/blog-separator-2.png" ></center><br> | ||
| + | |||
| + | ===Artifact's card=== | ||
| + | {| class="wikitable" | ||
|- style="vertical-align:top;" | |- style="vertical-align:top;" | ||
| − | | | + | | |
| − | + | ||
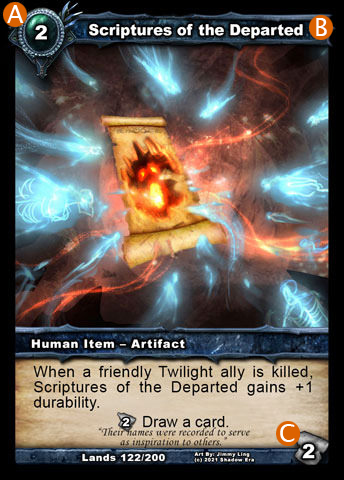
*'''G'''. '''[[:Category:Durability|Durability]]''': This indicates the durability of the [[:Category:Artifacts|artifact]]. When it drops to 0, the weapon is destroyed and goes to the [[:Category:Graveyard|graveyard]] | *'''G'''. '''[[:Category:Durability|Durability]]''': This indicates the durability of the [[:Category:Artifacts|artifact]]. When it drops to 0, the weapon is destroyed and goes to the [[:Category:Graveyard|graveyard]] | ||
| + | |- | ||
| + | | <center><big>'''[[:Category:Items|Item - Artifact card]]'''</big><br>[[Image:CardExampleSymbols2.jpg|link=https://www.shadowera.com/wiki/index.php/Category:Items]]</center> | ||
|} | |} | ||
<center><img src="https://www.shadowera.com/landing/img/blog-separator-2.png" ></center><br> | <center><img src="https://www.shadowera.com/landing/img/blog-separator-2.png" ></center><br> | ||
| Line 51: | Line 72: | ||
{| class="wikitable" | {| class="wikitable" | ||
|- style="vertical-align:top;" | |- style="vertical-align:top;" | ||
| − | | | + | | |
| − | + | ||
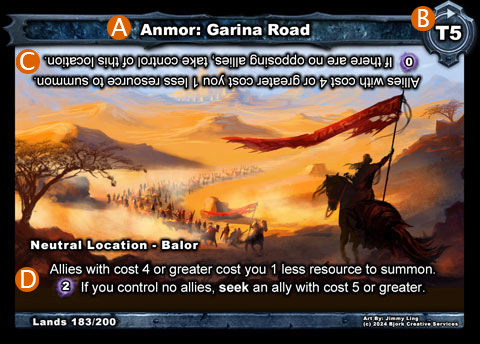
*'''A'''. '''Turn indicator''': Indicates at what turn the [[:Category:Location|location]] is first allowed to be played <small>(for instance, a card with the indicator "'''T3'''" may not be summoned on turns 1 or 2, but may be played on turn 3 or any time after that)</small>. | *'''A'''. '''Turn indicator''': Indicates at what turn the [[:Category:Location|location]] is first allowed to be played <small>(for instance, a card with the indicator "'''T3'''" may not be summoned on turns 1 or 2, but may be played on turn 3 or any time after that)</small>. | ||
*'''B'''. '''Abilities for the non-controller's location''': Only the non-controller can use this ability. | *'''B'''. '''Abilities for the non-controller's location''': Only the non-controller can use this ability. | ||
*'''C'''. '''Abilities for the controller's location''': Only the controller can use this ability. | *'''C'''. '''Abilities for the controller's location''': Only the controller can use this ability. | ||
| + | |- | ||
| + | | <center>[[Image:CardExampleSymbols4.jpg|link=https://www.shadowera.com/wiki/index.php/Category:Location]]</center> | ||
|} | |} | ||
| − | + | <center><img src="https://www.shadowera.com/landing/img/blog-separator-2.png" ></center><br> | |
<br><br> | <br><br> | ||
[[Category:Cards]] [[Category:Game_Board]] | [[Category:Cards]] [[Category:Game_Board]] | ||
Revision as of 00:28, 21 August 2024

Hero's card
|
 |
Ally's card
|
 |
Weapon's card
|
 |
Armor's card
|
 |
Artifact's card
|
 |
Location's card
|
 |
This category currently contains no pages or media.