

In today's article, we'll be focusing on the human world of Balor itself, where Shadow Era is set, exploring its different kingdoms by way of our new Location card type, including three new Location spoilers.
Please note: Whilst a lot of the content here is lore-focused, I strongly recommend you read the 2nd article in this series that explained all the new rules associated with Locations before continuing, since the six we're showcasing will be hard to understand without that information.
Welcome to Balor!
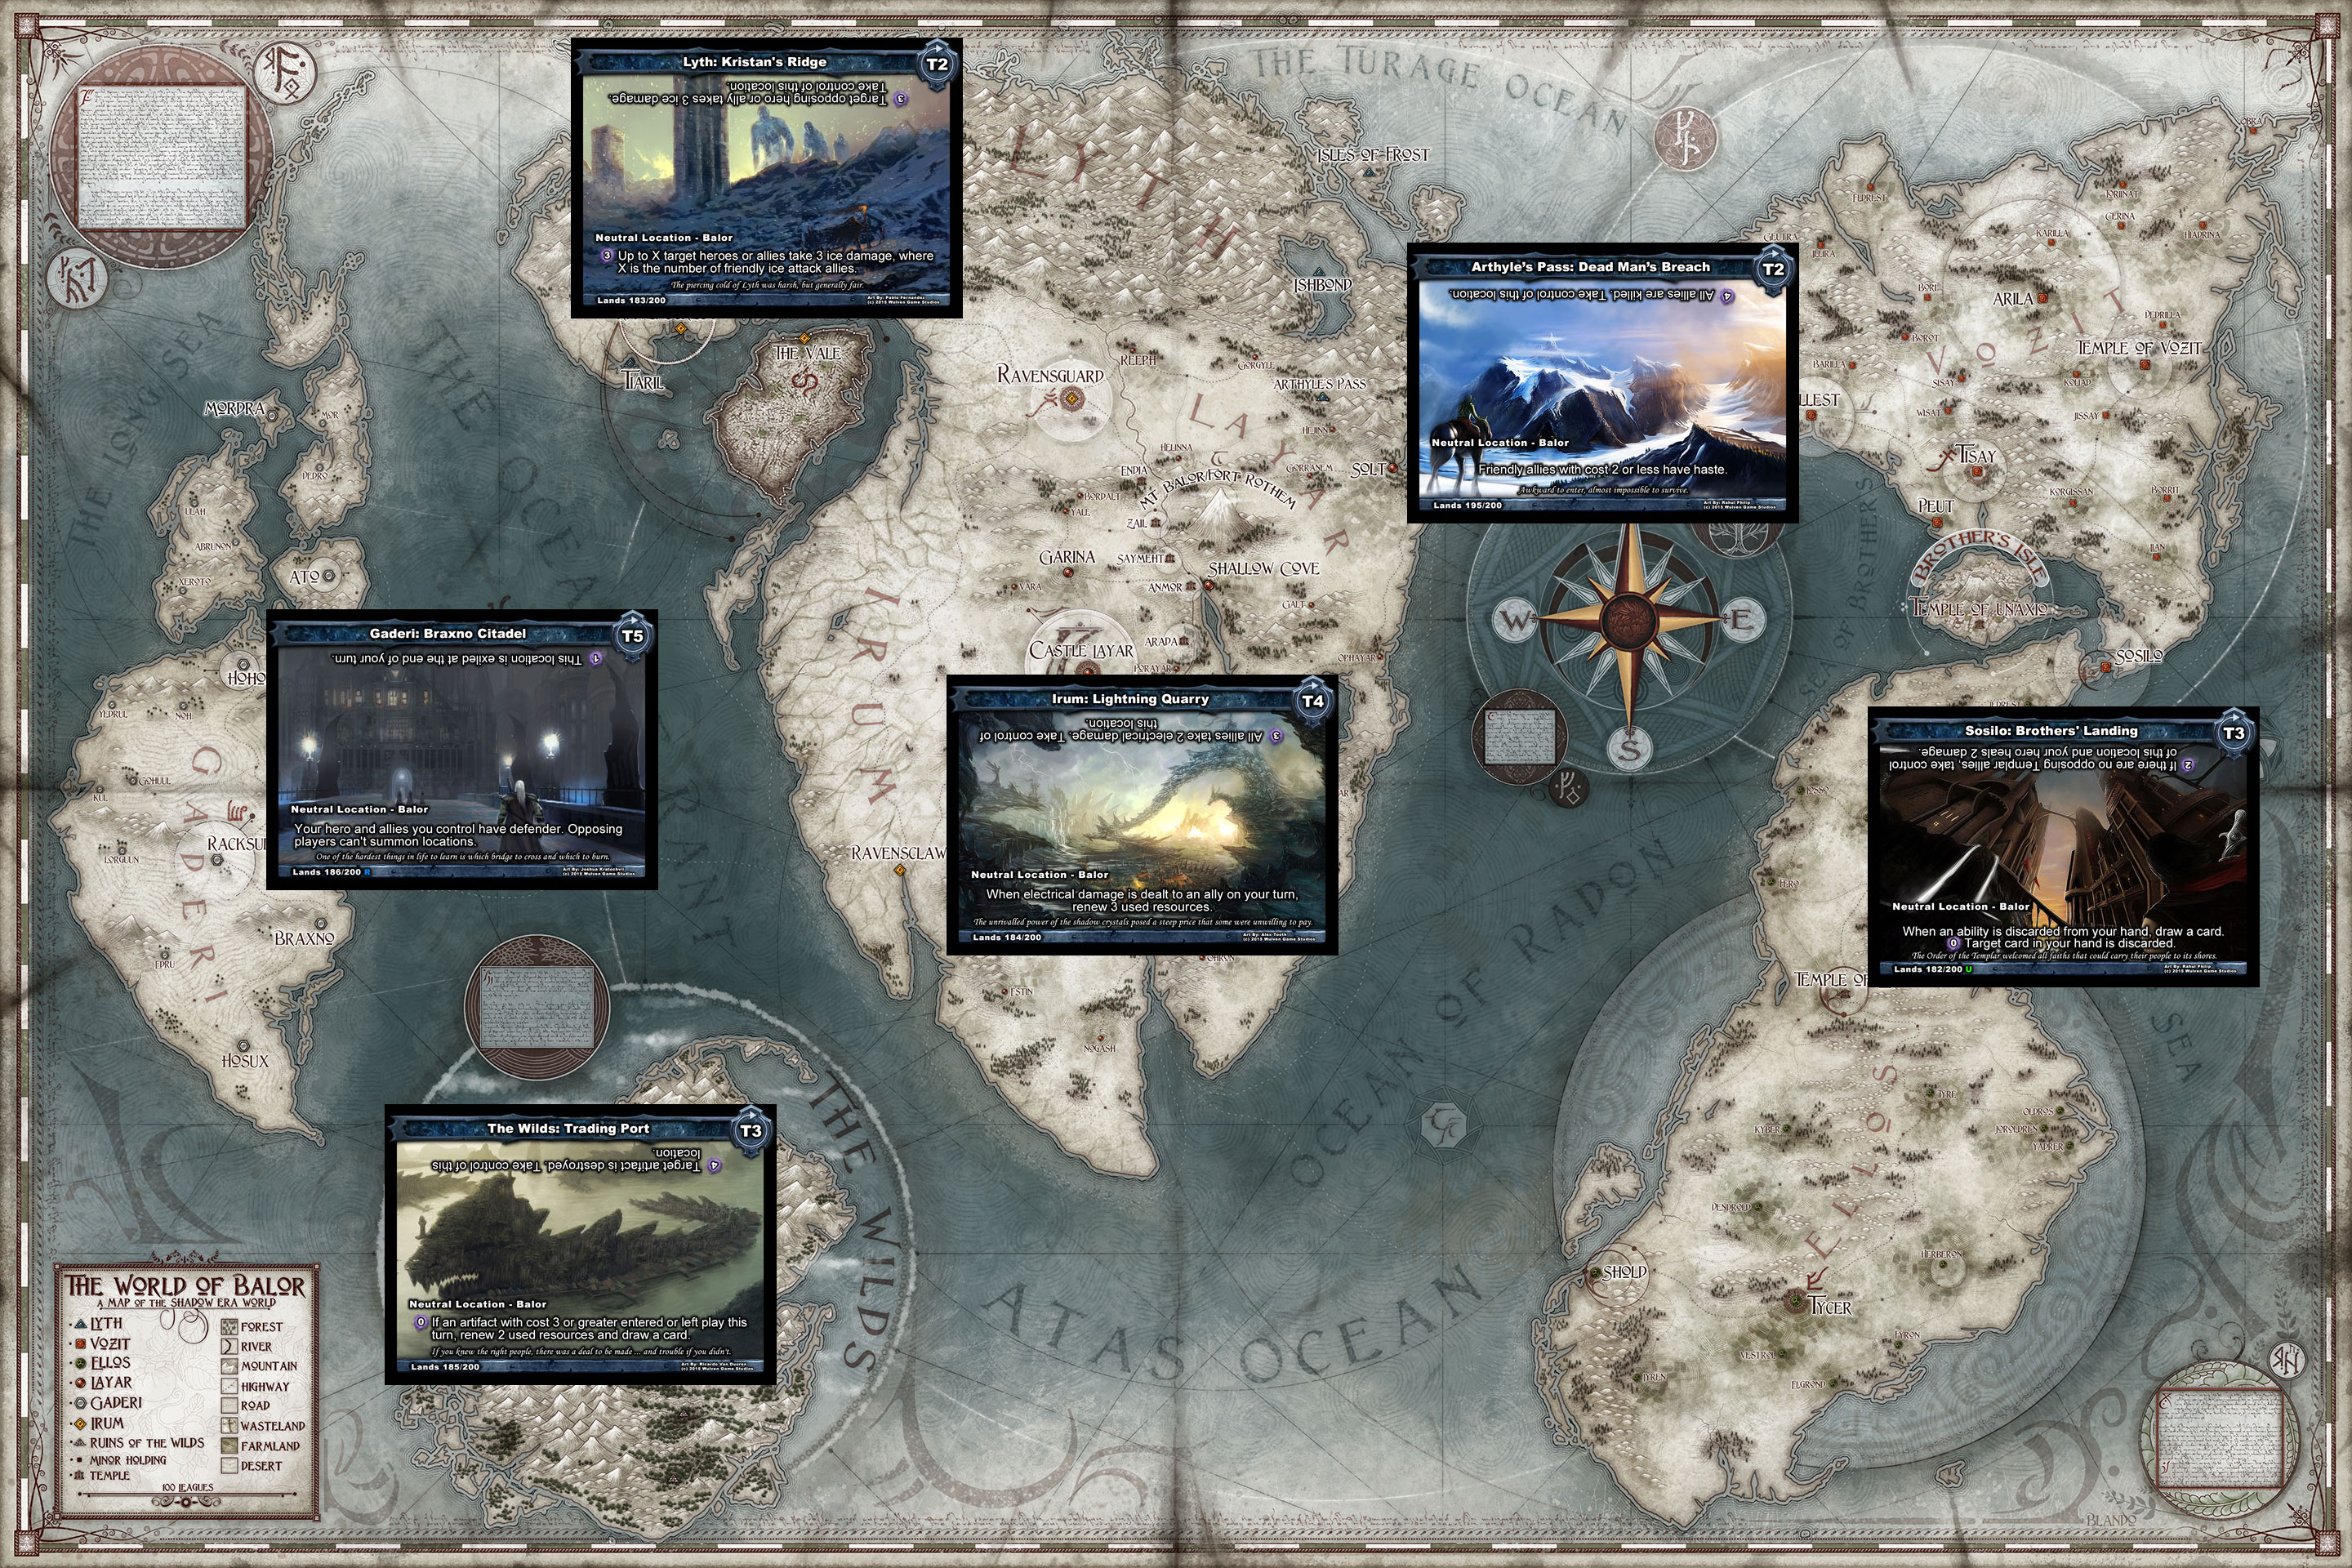
In case you've not yet seen it, here's our map of Balor:

Whether you click it for a more high-res detailed view or not, hopefully you can make out the six kingdoms - Lyth, Layar, Irum, Vozit, Ellos and Gaderi - and The Wilds, home of the Aldmor.
You've probably noticed that, in the first three sets of the game, we've made reference to some of these places within card names (e.g. Layarian Diplomat
 ) and flavor text (e.g. Divine Connection), but never went beyond that in the game itself.
But that's all changing in Lost Lands! So strap yourself in for a whirlwind tour of Balor's territories, where you will not only learn something about each, but you'll see how they are set to have a much larger impact on the game than ever before, through the Location cards based there.
Since Shadow Era's story began with the discovery of shadow crystals by Nishaven
during the construction of Fort Rothem atop Mount Balor, in Layar, we will start there and then expand just as the War of the Crystals did!LAYAR
Home of Nishaven
and Rothem.Topology:
- The mountains of Lyth end in a range on the northeast edge of Layar, terminating with Mt. Balor.
- Split in half by the River Anmor (branches from River Lyth, into the Ravenstide, and the Shallow Lake).
- Mostly plains with small areas of mountains and rolling hills.
- Large areas of farmland near Delash and Lorhorn.
Key Locations:
- Castle Layar (Capitol)
- Mt. Balor/Fort Rothem
(highest mountain in the world, Fort Rothem built atop it, Shadow Crystals discovered here)- Delash (Port City)
- Solt (Port City)
- Reeph (Small village)
- Lorhon (Large City)
- Garina (Large City)
- Shallow Cove (Small City)
- Temples of the Seven: Endia, Zail, Saymeht, Anmor, Arada, Rilard, Loesstin
Though not in Layar itself, Arthyle's Pass (first revealed in the original announcement) is sat right on its border with Lyth.

Speaking of Lyth ...
LYTH
Home of Eladwen
.Topology:
- Almost completely mountain ranges with only small passes here and there allowing travel.
- Ice-capped and almost completely covered in snow.
- The southern border is cut by the mountain range and the 'River Lyth' (from which the country draws its name).
- Islands off the coast are surrounded by the 'White Sea'.
Key Locations:
- Tiaril (Capitol)
- Ishbond ('Icebound' a city built upon the surface of the frozen lake)
- Arthyle's Pass
- Isles of Frost (Center island home to the College of Lyth; surrounded by White Sea)
- Kristan's Ridge
(named for the first Queen of Lyth, who perished there)This seems a great time to introduce our first spoiler of the week:

Unlike previous locations we've spoiled, Kristan's Ridge
showcases a different style of Location, which is intended to act like an alternative hero ability for heroes that have less generically useful abilities (e.g. Ter Adun, Gravebone). In this case, through following an ice attack theme with their allies, there is the option there to play the location at a key time to fire off that high-value alternate hero ability when their own hero ability is not relevant to the match-up or situation within the game. Ideally, from their perspective, the location will stay active for the rest of the game, but the opponent may, of course, replace it with their own location.To keep it fair to players who are not running locations, we have two features built into the non-controller part of this one. Firstly, the opponent gets a strong alternate hero ability to use themselves, which will work regardless of their amount of ice attack allies. Secondly, that same ability can also take control of the site, meaning that the original controller will now get substantially less value for their next usage of it when they have more than one ice attack ally out (but can also re-take control).
We're hoping this alt-hero ability style of location leads to more surprises within games and also more opportunities to bluff your opponent (e.g. establish a group of ice attack allies on board without the Location in hand, or even in your deck!). Be sure to let us know your thoughts in the comments below!

IRUM
Home of Gwenneth
.Topology:
- Almost completely desolate wasteland of dried stone.
- Very sparse farmland, almost all located around Ravensguard.
- Bordered to the east by Ravenstide (River).
- The Vale is surrounded by the 'Swan's Sea'.
- The Vale is bordered by a large and formidable wall only accessible from the port.
- The Vale, having formerly been its own nation, is covered wall to wall with cityscape.
Key locations:
- The Vale (Capitol of the Swan)
- The Vale's port
- Ravenscrest (Port City)
- Ravensclaw (Port City; specifically for pirates and their ilk)
- Dar'Yari (Home of the Yari)
- Ravensguard (Capitol of the Raven
)If you didn't see it already, here's the Lightning Quarry
(first revealed in article 5):
VOZIT
Home of Serena Thoughtripper
.Topography:
- Mostly rolling hills.
- Heavy banks of snow to the north, leading to plains of pure ice.
- More cityscape.
Key locations:
- Temple of Vozit
- Tisay (Capitol)
- Peut (Port city)
- Arila (City of Nobles, major merchant city)
- Rillest (Secondary port city, specializing in the purchase of Lythite)
- Sosilo (Sosilo is a city in two parts; one on each side of a bridge that connects Vozit and Ellos)
Vozit and Ellos (see below), each named for the brother God they worship, have had many conflicts over the ages. Their wars have been among the longest and bloodiest in the history of Balor (to date) and only ever ceased when a leader rose who was tired of the bloodshed. After too many of these wars, a priest had a vision while reading the ancient texts of both gods. In his vision Ellos and Vozit were not enemies but allied, an alliance that made both stronger. This vision he transformed into an institution in homage to 'Unaxio', an ancient word believed to mean 'Brother's United'. This order created a group known as Templar; powerful fighters capable of maintaining the peace between the countries through the might of their faith. Their spiritual home became Brothers' Isle, an ancient dormant volcano, surround by sea, to which Brothers' Landing
(first revealed in article 2) acts as the first welcoming point for visitors who have traveled from more distant shores.
ELLOS
Home of Jericho Spellbane
.Topography:
- Verdant and beautiful, filled with massive plains that lend themselves wonderfully to the cavalry they train there.
- Short coastline.
- Mostly flatlands/plains.
- Scattered rolling hills, primarily to the north.
Key locations:
- Temple of Ellos
- Tycer (Capitol)
- Shold (Port City)
- Sosilo (City of the Bridge)
GADERI
Home of Boris Skullcrusher
.Topology:
- Primarily desert/wasteland.
- Small stripes of natural stone serve as roads for connecting villages.
- Tiny pockets of water and vegetation sporadically placed.
- Small mountain ranges on unoccupied islands and on the mainland.
- Islands are surrounded by the 'Sea of Spirits'.
Key locations:
- Hosux (village)
- Hohon (village)
- Ato (village)
- Mordra (village)
- Racksul ('Ground of Peace'; neutral gathering zone)
- Braxno (capitol, home of Karlstrad
)This brings us nicely to our second spoiler of this week:

Braxno Citadel
represents another style of location we've not revealed until now, offering protective capabilities as well as disruption, which is aimed at mid-range, control decks and combo decks. Note the high turn number of 5!I don't mind admitting that designing locations of this kind was a challenging task, predominantly due to the location rules that allow the opponent to replace the location on their turn, meaning that effects that are only relevant on the opponent's turn are inherently risky to invest in. Even if you have played the card for free, there is still the opportunity cost of putting that in your deck instead of something else and drawing it into your hand instead of something else, as well as the loss of a card from your hand.
To combat this aspect, the second passive ensures that the opponent can not easily take away the effect just by playing their own location. Beyond that, it also stops the opponent achieving any offensive effect from a location they might have been planning to play, which can offer disruptive value even if the first passive ends up being irrelevant. (Consider a case where you are facing a horde of ice attack allies and expect Kristan's Ridge
to hit the next turn.)Speaking of the first passive, this marks the return of a fairly underused keyword that players have been telling us they would like to see more of: defender (when this hero/ally is attacked, the attacker takes combat damage first).
The reason it doesn't show up much is because it is actually very powerful and can pose balance problems. Having it built into an ally with high-attack or offered on an ongoing basis by a support card could really screw with certain decks (with limited removal and ability damage), so we have proceeded with caution as designers to date, giving it only to low attack allies and provided it only on a short-term basis on support cards.
The problem is then that there is limited incentive to use them, either due to the ally being inherently weak or the cost of the support card interfering with establishing a board situation that is worth supporting (you would usually want to do that in one go). Since Braxno Citadel
applies to any ally you wish to play (and your hero) and it costs no resources to play, and it has the potential to last multiple turns, there is great opportunity here to actually get some value from this keyword by playing a couple of high-attack allies (and maybe a weapon) and the location all on the same turn, and potentially using it beyond that turn as well.But, of course, if the Location could stay active forever, that would be overpowered, so the second trick that helps balance the location is the non-controller ability that lets them pay 1 shadow energy to exile the location at the end of their turn. So the effect is pretty much guaranteed to last one of their turns (Void Wretch says "hi"), but may last beyond that and it's really down to the choice of the opponent, who will almost always have 1 shadow energy to spend due to the generation at the start of their turn. But that choice may sometimes be difficult (e.g. they were planning to use their hero ability that turn and have none spare), which represents the other type of disruption possible for the controller to achieve.
THE WILDS
Home of the Aldmor.
Topography:
- Surrounded by sheer cliff faces and mountains.
- Covered almost entirely by dense jungle.
- Little else about the area is known by outsiders.
As we learned in a previous article, the Aldmor have a specialty for knowledge and production of useful devices and tools, with innovations occurring in all manner of areas. Each artisan and their craftwork would be highly valued for their bespoke skills and creations. This naturally led to the emergence of internal trading, which took place in an island port to ensure mutual safety for all those involved, since any approaching threats could be easily seen and responded to.
Speaking of being seen and responded to, check out our third spoiler of the week and let us know what you think!

The Trading Port
represents the third style of location being showcased today, which is that of an enhancer, aimed at rewarding decks that are built in a less traditional manner (such as theme decks). You've probably already noticed this style in the form of Dead Man's Breach (enhances super-weenie builds), Brothers' Landing (enhances ability-discard builds) and Lightning Quarry (enhances electrical-damage builds).In this case, we're boosting the value of running a reasonable number of artifacts in your deck, essentially offering a "tempo rebate" when you play one. You've probably noticed that, in Shadow Era to date, it is usually hard to establish a sizeable board of artifacts and not lose in the process, due to leaving your hero open to an ever-growing board of opposing allies. Since one of the Aldmor themes is artifacts, we need to counteract that somewhat!
But the value does not end there. Since it also becomes usable if an artifact has left play that turn, there's additional opportunity to use it. This is of particular interest to Ter Adun
and Ravagers, who have a tendency for destroying artifacts, whether their own or belonging to an opponent.As with almost all other locations, to stop the ongoing benefit from lasting the whole game, the opponent will have the opportunity to replace it at the top of the location stack with one of their own. But since we do not wish to require everyone to run locations to be competitive, there's also the in-built non-controller ability that lets them take control of the location for a cost, which you've probably noticed on some of the other locations too.
Usually the taking control effect is accompanied by another relevant one. In the case of Trading Port
, we offer an alternative hero ability of sorts that will help them deal with particularly challenging artifacts for a heavy cost, as well as present a potentially devastating downside that the controller has to play around.In terms of the latter, providing the opponent can reach 4 shadow energy to spend, there's the risk of having an artifact destroyed, losing control of the site AND having the opponent immediately activate the controller text to draw a card and renew 2 resources! They can, of course, attempt to get the location back again, but they will have to pay 4 shadow energy of their own to do so. Usually they would just play another copy of the location, but most of the damage will have already been done!
The Journey Continues!
That concludes our tour for this week. I hope you've enjoyed finding out more about Balor and the design of the location cards. If you want to see all those Location cards on the map in roughly where they are based, see below (click for larger high-res version).
As more of Lost Lands Part 1 is revealed, be sure to look out for more locations from Balor ... and beyond!

 Sections


vBulletin Message